Environmental Resources
Contact Info
Julie Haas-Wajdowicz
Environmental Resources Coordinator
Environmental Resources Line
Related Items
- List here
![]()
Environmental Resources
Water Conservation Self Audit
Are you using water wisely at home? This do-it-yourself water audit will help you understand how much water you use, what you use it for, identify leaks and other ways you can reduce your family’s water consumption.
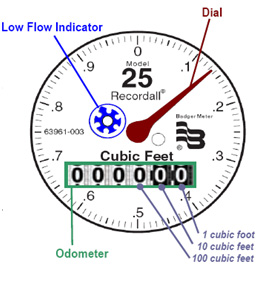
- Follow the flow- read your water meter
The first steps to reducing your water consumption are knowing how much water you currently consume and tracking your consumption. You can access your consumption history by creating an online water bill paying account at https://www.municipalonlinepayments.com/antiochca. Print out this flyer and worksheet on how to read your meter so that you can monitor your conservation efforts. You may also use CCWD’s online calculator at www.ccwater.com/conserve/water_calculator.asp.
Check you meter when you are not running any water (no showers, laundry going, etc.). If the low-flow detector (blue dial on meter) is moving at all you have a leak or water running somewhere. This dial will move for the smallest flow, such as a dripping faucet. If the dial is moving, the next step is to track it down! Leaks are often found in toilets and faucets, so complete the rest of the audit before you dig deeper. - Indoors –To complete this part of the audit, you will be inspecting all bathrooms, the kitchen and any other sinks such as the laundry room or wet bar.
You will need the following supplies:
- paper to record your findings on
- pen or pencil
- a pitcher
- a measuring cup
- a stop watch or watch with a second hand
Checking for Leaks– With faucets and showerheads a simple observation will tell you if you have a leak. These drips can add up over time. To calculate water loss from a dripping faucet, count how many drips fall in one minute. (Note that on your sheet and use this drip calculator to determine the water loss over time. – http://www.awwa.org/resources-tools/public-affairs/public-information/dripcalculator.aspx). Check for toilet leaks by putting some food coloring (avoid using yellow or red) or dye tabs in the tank. Do not flush or use the toilet for 15-30 minutes. Look inside the toilet bowl, if the water has changed colors, you have a leak.
Calculating Flow Rates- If your house was built or remodeled after 1992 you should have standard conservation measures already in place. The flow rates on these fixtures can increase over time, so it is still a good idea to check the flow.
Faucets and showerheads- To do this you will need a pitcher, a measuring cup and a stop watch or watch with a second hand. Turn the water on full stream. Put the pitcher under the faucet or showerhead for 5 seconds. Use a measuring cup to determine the volume of water in the pitcher.
Enter that volume into the equation below.
X 0.0625 X 12 = gallons per minute (gpm)
# of cups
If your showerheads use more than 2.5 gpm and your faucet aerators use more than 2.0 gpm you should change them out for more efficient ones. The City of Antioch has brass and chrome bathroom faucet aerators and white showerheads available by request.
3. Outdoor- 50-75% of your water consumption is used on your landscaping. Run your sprinklers monthly to inspect for misdirected sprinkler heads, breaks and clogs or over watered areas. For more information on water efficient gardening including forms to use while inspecting your irrigation system, visit www.contracosta.watersavingplants.com.
Leaks and/or breaks: Once a month throughout the irrigation season (April through October/November), run your system in manual mode to check for leaks or breaks. This helps to protect against plant loss and offers a simple way to be water wise. Also look for: broken or tilted sprinkler heads; rotors stuck in place; misting (indicates water pressure is too high); uneven water coverage due to head spacing (water sprayed from each sprinkler head should reach adjacent sprinkler heads); heads not at grade (too high or too low); mismatched sprinkler heads and nozzles (prevents even precipitation rates); spray patterns blocked by plants; clogged nozzles or drip emitters; clogged filters; leaking or separated drip lines; missing emitters. A broken head not only wastes water, but if not repaired will create brown spots in the lawn.
Flushing the system: If sprinkler heads or drip emitters become clogged, they will need to be flushed.
For sprinkler systems – remove individual nozzles from sprinklers. Turn system on for a few minutes until a clean, solid stream of water flows from each sprinkler head. Turn system off. Check nozzles before replacing to be sure they are not clogged. Clean and replace clogged nozzles. Turn system on and check for proper operation.
For drip systems – remove end caps from drip lines. Turn system on for a few minutes until a clean, solid stream of water flows from the end of the line(s). Turn system on. Replace end caps. Turn system on and check for proper operation. Replace emitters that are not functioning properly.
Adjusting sprinklers: Adjust sprinkler heads as much as possible so that water from each head just reaches the adjacent head(s). This 100% overlapping pattern improves water coverage and can reduce dry spot and wet spot problems. Check the arc of rotor and impact sprinklers to ensure that they are not overspraying onto driveways and walks.
Hardware compatibility: Determine if sprinkler heads within each valve circuit match (not all brands and models are interchangeable and/or compatible). Be sure that sprinkler heads within each valve circuit have the same precipitation rate for even coverage. Additionally, the radius of nozzles (the distance the nozzle is designed to spray water) should match actual spacing of sprinkler heads to achieve head-to-head coverage.